Hi friends,
Here, we’re going to learn an Angular + Spring Boot project step-by-step.
ABOUT
After reading this post, you’ll be able to develop an Angular + Spring Boot project. We’re about to absorb new things through an example. We’re going to create a temperature converter app, that converts temperature from Celsius to Fahrenheit and vice versa.

WHAT
See what the doc says about Angular.
Angular is a platform that makes it easy to build applications with the web. It is a JavaScript-based open-source front-end web application framework mainly maintained by Google and by a community of individuals and corporations to address many of the challenges encountered in developing single-page applications.
And about Spring Boot.
Spring Boot is a project built on the top of the Spring framework. It provides a simpler and faster way to set up, configure, and run both simple and web-based applications. Spring Boot makes it easy to create stand-alone, production-grade Spring based Applications that you can “just run”.
PREREQUISITES
- Node
- npm
- Angular
- Java 8
- Eclipse
- Gradle
- Visual Studio Code
If you don’t know how to install node, npm and Angular, following instructions will help you out.
INSTALLATION GUIDE
- Download Node and npm binary packages.
- Extract zip to a folder.
- Add Node and npm to PATH environment variable.
(You can either download and install the executable file)
- Check node and npm installations, node –version, npm –version.
- Install Angular
- In the terminal, type npm install -g @angular/cli.
- If you ever come across this error, SELF_SIGNED_CERT_IN_CHAIN while installing angular, type npm set strict-ssl false in the terminal. This error arises as you sit behind a corporate proxy and SSL certificate is not verified. So this would be a workaround.
- If you stumble on this error, request to https//registry.npmjs.org/@angular 2fcli failed reason connect etimedout, while downloading angular, you have to remove https proxy setting of npm, by typing npm config rm proxy & npm config rm https-proxy in the terminal.
- Check Angular installation ng –version.
HOW
Step 1:
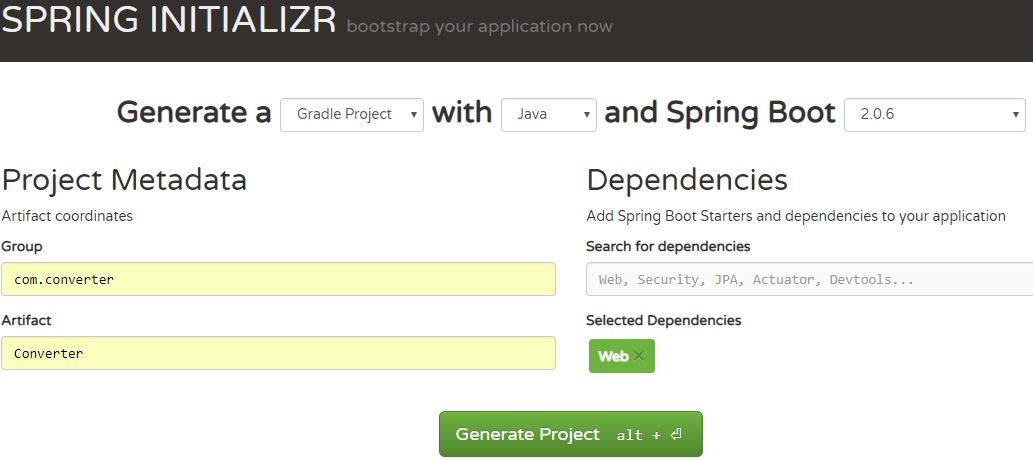
We are starting off this project with a back-end component (web service). For that we have to generate a Gradle project with Spring Boot 2.0.6, by visiting this site. Add “Web” dependency to our project and download the project.
Step 2:
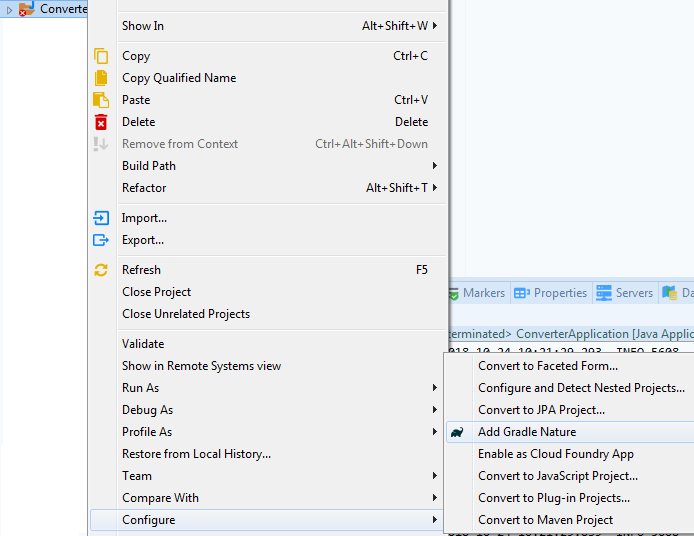
Extract downloaded zip to a folder and open it in eclipse IDE. Then add Gradle Nature to the project.
Step 3:
Open build.gradle and make these changes. Leave it if the changes have already been there.
build.gradle
buildscript {
ext {
springBootVersion = '1.5.2.RELEASE'
}
repositories {
mavenCentral()
}
dependencies {
classpath("org.springframework.boot:spring-boot-gradle-plugin:${springBootVersion}")
}
}

apply plugin: 'java'
apply plugin: 'eclipse'
apply plugin: 'org.springframework.boot'
apply plugin: 'io.spring.dependency-management'

group = 'com.converter'
version = '0.0.1-SNAPSHOT'
sourceCompatibility = 1.8

repositories {
mavenCentral()
}

dependencies {
compile('org.springframework.boot:spring-boot-starter-web')
testCompile('org.springframework.boot:spring-boot-starter-test')
}
Step 4:
Open application.properties file and set port number for our project.
application.properties
server.port=9900
This will make our application run on this port.
Step 5:
Leave the main class as it is.
ConverterApplication.java
package com.converter;

import org.springframework.boot.SpringApplication;
import org.springframework.boot.autoconfigure.SpringBootApplication;

@SpringBootApplication
public class ConverterApplication {

public static void main(String[] args) {
SpringApplication.run(ConverterApplication.class, args);
}
}
Step 6:
Create a new package, namely com.converter.config and add the following class to it.
CorsConfig.java
package com.converter.config;

import org.springframework.context.annotation.Bean;
import org.springframework.context.annotation.Configuration;
import org.springframework.web.servlet.config.annotation.CorsRegistry;
import org.springframework.web.servlet.config.annotation.WebMvcConfigurer;
import org.springframework.web.servlet.config.annotation.WebMvcConfigurerAdapter;

@Configuration
public class CorsConfig {

@Bean
public WebMvcConfigurer corsConfigurer() {
return new WebMvcConfigurerAdapter() {
@Override
public void addCorsMappings(CorsRegistry registry) {
registry.addMapping("/**").allowedMethods("HEAD", "GET", "PUT", "POST", "DELETE", "PATCH");
}
};
}
}
What is CORS ?
Cross-Origin Resource Sharing (CORS) is a security concept that prevents you accessing the resources residing outside the current origin.
For security reasons, browsers prohibit AJAX calls to resources residing outside the current origin.
Cross-origin resource sharing (CORS) is a W3C specification implemented by most browsers that allows you to specify in a flexible way what kind of cross domain requests are authorized, instead of using some less secured and less powerful hacks like IFrame or JSONP.
Spring Framework 4.2 GA provides first class support for CORS out-of-the-box, giving you an easier and more powerful way to configure it than typical filter based solutions.
For example, when your web application (Angular app) is running on port 4200, and from that app you are trying to access a RESTful web service running on port 9900, then the browser blocks the web application from accessing the web service.
To avoid these things happen, we’ll have to add the given configuration class. Here the CORS configuration has been set globally. We can also give CORS configuration for a particular method also. For that we have to add the following annotation before your end point.
@CrossOrigin(origins = "http://localhost:4200")
@RequestMapping(method = RequestMethod.POST)
public Map convert(@RequestBody ConverterDTO converter) {
}
Step 7:
Create another package, namely com.converter.controller and add the following class to it.
ConverterController.java
package com.converter.controller;

import java.util.HashMap;
import java.util.Map;

import org.springframework.beans.factory.annotation.Autowired;
import org.springframework.web.bind.annotation.RequestBody;
import org.springframework.web.bind.annotation.RequestMapping;
import org.springframework.web.bind.annotation.RequestMethod;
import org.springframework.web.bind.annotation.RestController;

import com.converter.dto.ConverterDTO;
import com.converter.service.ConverterService;

@RestController
@RequestMapping(value = "/converter")
public class ConverterController {

@Autowired
ConverterService converterService;

@RequestMapping(method = RequestMethod.POST)
public Map<String, Double> convert(@RequestBody ConverterDTO converter) {
Map<String, Double> map = new HashMap<>();
Double result = converterService.convert(converter.getType(), converter.getValue());
map.put("result", result);
return map;
}
}
The class is given with mapping of “/converter“, which enables our application to accept an HTTP POST request when the given URL is hit.
http://localhost:9900/converter
The class has one and only one public method namely convert() and it accepts a DTO object.
Step 8:
Create the DTO object under a new package, namely com.converter.dto.
ConverterDTO.java
package com.converter.dto;

public class ConverterDTO {

double value;
String type;

public String getType() {
return type;
}

public void setType(String type) {
this.type = type;
}

public double getValue() {
return value;
}

public void setValue(double value) {
this.value = value;
}
}
Step 9:
Now we can create a service class as well as an implementation class under two new packages, namely com.converter.service and com.converter.service.impl.
ConverterService.java
package com.converter.service;

import org.springframework.stereotype.Service;

@Service
@FunctionalInterface
public interface ConverterService {
public Double convert(String type, double value);
}
If you’re not familiar with functional interfaces in java, please read this article.
ConverterServiceImpl.java
package com.converter.service.impl;

import org.springframework.stereotype.Service;

import com.converter.service.ConverterService;
import com.converter.util.ConversionFormulae;

@Service
public class ConverterServiceImpl implements ConverterService {

@Override
public Double convert(String type, double value) {
return "f2c".equals(type) ? ConversionFormulae.F2C.apply(value) : ConversionFormulae.C2F.apply(value);
}
}
Step 10:
We’ve almost reached our destination for creating a RESTful web service, and finally need to be defined the core part, i.e, the conversion logic. For that, we need to create a new package, namely com.converter.util and add the following class to it.
ConversionFormulae.java
package com.converter.util;
import java.util.function.Function;
public class ConversionFormulae {
public static final Function<Double, Double> F2C = f -> (f - 32) * 5 / 9;
public static final Function<Double, Double> C2F = c -> c * 9 / 5 + 32;
}
Step 11:
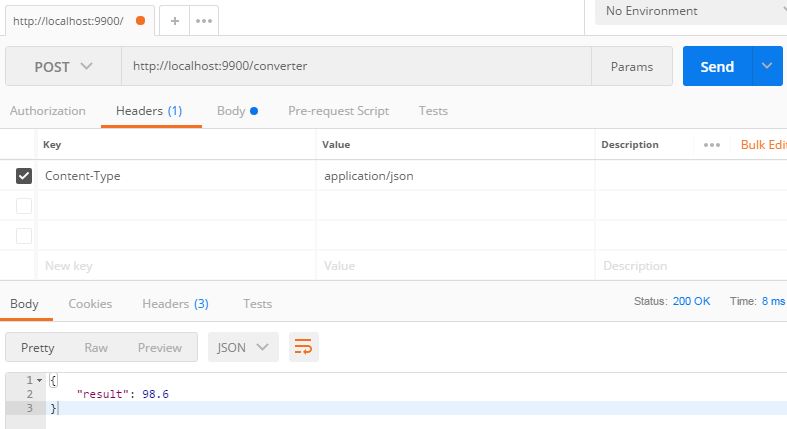
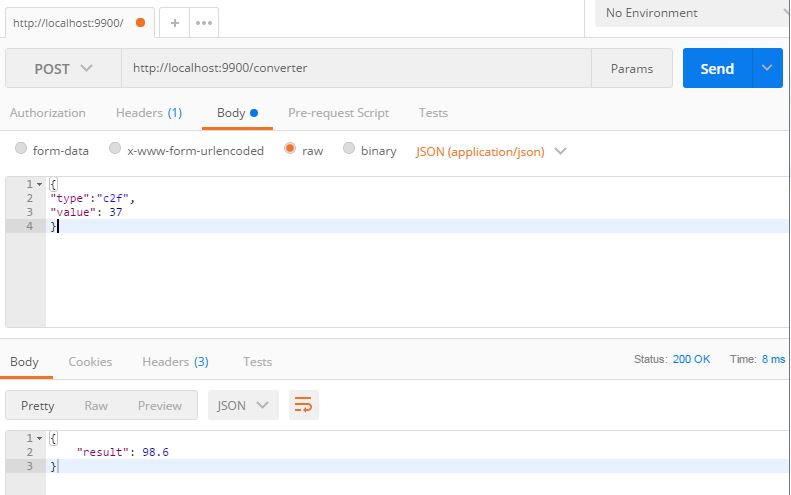
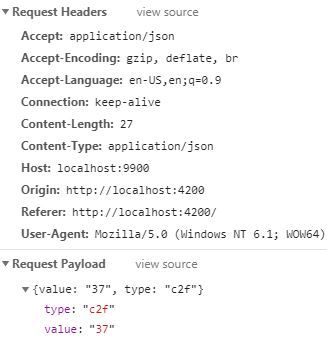
Whoa, we’ve done. Now we can run the main class (ConverterApplication.java) and our application will run on port 9900. We can test the functionality of our application by using HTTP clients. Here, I tested it with Postman and see what I got.
The project structure will look like this.
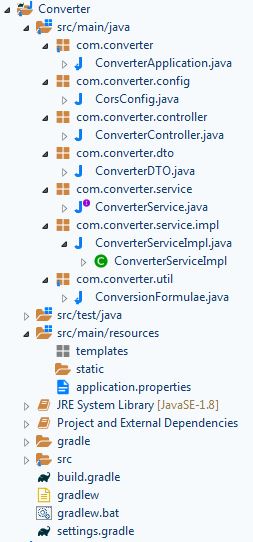
It’s cool. We’ve completed the back-end component and reached halfway to the goal, Now It’s the time to develop the front-end component, i.e, Angular app.
Step 12:
Open cmd and create a new angular project by typing ng new [project-name] in the terminal. In our case, type ng new TemperatureConverter. After having the project created, open it in Visual Studio Code (VS Code). Open the integrated terminal provided with VS Code, then go to the project folder and type ng serve -o. Now the project is being built and runs the application in your browser. You can see the Angular demo page in your browser.
Step 13:
Modify the following file. app-converter is the name of the component that we are going to create. While running the application, this component is shown to the user.
app.component.html
<app-converter></app-converter>
Step 14:
Create a new folder, namely _components under TemperatureConverter > src > app. Open the terminal, then go to the newly created folder, and create a new angular component by typing ng generate component [name]. In our case, type ng generate component converter. After having the component created, you can see a new folder namely converter was created under _components folder and four new files were also created. Now copy the following codes to the corresponding files.
converter.component.html
<div>
<form class="form-group" novalidate [formGroup]="converterForm" (ngSubmit)="convert()">
<div class="col col-lg">
<input type="text" class="text-box" [placeholder]="srcPh" formControlName="srcVal" />
<div class="error" *ngIf="converterForm.get('srcVal').touched && converterForm.get('srcVal').hasError('required')">Source temp. required</div>
<div class="error" *ngIf="converterForm.get('srcVal').touched && converterForm.get('srcVal').hasError('invalidNumber')">Source temp. must be a number</div>
</div>
<div class="col col-sm"><img class="pointer" src="/assets/swap.png" (click)="swap()" title="Swap" /></div>
<div class="col col-lg"><input type="text" class="text-box" [placeholder]="targPh" formControlName="targVal" /></div>
<div class="col col-lg"><button type="submit" [disabled]="converterForm.invalid">Convert</button></div>
<div><input type="text" hidden formControlName="type" /></div>
</form>
</div>
In this example, I’ve put an image to swap the units between. When the user clicks on the image, the units would be swapped to each other. You need to put your swap image in the following path, TemperatureConverter > src > assets.
converter.component.css
.form-group {height: 100%; width:100%; font-family: "Century Gothic", CenturyGothic, Geneva, AppleGothic, sans-serif; font-size: 13px;}
.col {display: inline-block; *display: inline; zoom: 1; vertical-align: top;}
.col-lg {width: 12%;}
.col-sm {width: 4%;}
.text-box {height: 30px; width: 180px; margin-bottom: 5px; border: 0; outline: 0; background: transparent; border-bottom: 1px solid black; font-weight: bold;}
.error {color: red;}
.pointer {cursor: pointer;}
button:disabled {background: #89C4F4; border: 1px solid #89C4F4 !important; cursor: not-allowed;}
button {color: #fff; background: #0076be; border: 1px solid #0076be !important; cursor: pointer; display: inline-block; font-size: 15px !important;
line-height: normal; overflow: visible; height: auto !important; padding: 5px 25px !important; border-radius: 0px !important; outline: none;}
converter.component.ts
import { Component, OnInit, Input } from '@angular/core';
import { FormBuilder, FormGroup, Validators } from '@angular/forms';
import { Converter } from '../../_models/index';
import { ConverterService } from '../../_services/index';
import { CustomValidator } from '../../_validators/CustomValidator';
import { Observable } from 'rxjs';

@Component({
selector: 'app-converter',
templateUrl: './converter.component.html',
styleUrls: ['./converter.component.css']
})
export class ConverterComponent implements OnInit {

converterForm: FormGroup;

@Input() srcPh;
@Input() targPh;

constructor(private converterService: ConverterService, private fb: FormBuilder) {
this.srcPh = "Temp. in Celsius";
this.targPh = "Temp. in Fahrenheit"
}

ngOnInit() {
this.converterForm = this.fb.group({
srcVal: ['', [Validators.required, CustomValidator.numberRequired]],
targVal: [''],
type: ['c2f'],
});
}

convert(): void {
let converter = this.converterForm.value;
this.converterService.convert(converter).subscribe(res => { this.setConvertedValue(res.result) }, err => { alert(err.message) });;
}

swap(): void {
let converter = this.converterForm.value;
let type = "c2f" == converter.type ? "f2c" : "c2f";
if ("c2f" == type) {
this.srcPh = "Temp. in Celsius";
this.targPh = "Temp. in Fahrenheit";
} else {
this.srcPh = "Temp. in Fahrenheit";
this.targPh = "Temp. in Celsius";
}
this.converterForm.reset();
this.converterForm.controls['type'].setValue(type);
}

setConvertedValue(response: number): void {
this.converterForm.controls['targVal'].setValue(response);
}

}
Leave the converter.component.spec.ts as it is.
Step 15:
Create another folder, namely _models under TemperatureConverter > src > app and add the following files to it. converter.ts is the model class, that will be bound with the view (converter.component.html) while the application starts.
converter.ts
export interface Converter {
srcVal: number;
targVal: number;
type: string;

}
index.ts
export * from './converter';
One more thing to share is, suppose we are creating a large scale application and we have generated several components. Some-wheres we need to import these components to make use of it. For that, there are two options in front of us.
- Import SeparatelyIn this approach, there will be a separate import statement for each model, even if those models are under the same parent folder. But this is awkward.
Eg:
import { firstComponent } from ‘./_models/one.component’;
import { secondComponent } from ‘./_models/two.component’;
import { thirdComponent } from ‘./_models/three.component’;
- Import simultaneouslyThis approach eliminates the awkwardness, that we discussed about in the first approach. In this approach, we import all the dependencies in a single line.
Eg:
import { firstComponent, secondComponent, thirdComponent } from ‘./_models/index’;
And the index.ts would be
export * from ‘./FirstComponent’;
export * from ‘./SecondComponent’;
export * from ‘./ThirdComponent’;
This time, it look pretty, right ? We can import more than one component / service in the same import statement even though they are in different .ts files. This is possible because of index.ts file.
Step 16:
Create another folder namely _services under TemperatureConverter > src > app. Then, generate a service by typing ng generate service converter in the terminal. This creates a new file converter.service.ts. Copy the following lines of code to it.
converter.service.ts
import { Injectable } from '@angular/core';
import { Converter } from '../_models/index';
import { HttpClient } from '@angular/common/http';
import { RestConfiguration } from '../_config/index';
import { Observable } from 'rxjs';

@Injectable()
export class ConverterService {

constructor(private http: HttpClient, private config: RestConfiguration) { }
public convert(converter: Converter): Observable<any> {
const data = { value: converter.srcVal, type: converter.type };
return this.http.post(this.config.url, data);

}
}
This service class tries to send data to convert to the web service and accepts its response.
Create yet another file, namely index.ts, under TemperatureConverter > src > app and add the following code to it.
index.ts
export * from './converter.service';
Step 17:
Create another folder namely _config under TemperatureConverter > src > app and add the following files to it.
RestConfiguration.ts
import { Injectable } from '@angular/core';

@Injectable()
export class RestConfiguration {
private host = "http://localhost"
private port = "9900"
private api = "converter"
public url = this.host + ":" + this.port + "/" + this.api;
}
This configuration defines the connection parameters, which is eventually used by the service class.
RestInterceptor.ts
import { Injectable } from "@angular/core";
import { HttpClient, HttpEvent, HttpHandler, HttpInterceptor, HttpRequest } from '@angular/common/http';
import { Observable } from 'rxjs';
@Injectable()
export class RestInterceptor implements HttpInterceptor {
intercept(req: HttpRequest, next: HttpHandler): Observable&amp;amp;amp;amp;amp;amp;amp;amp;amp;amp;amp;amp;amp;amp;amp;amp;amp;amp;lt;HttpEvent&amp;amp;amp;amp;amp;amp;amp;amp;amp;amp;amp;amp;amp;amp;amp;amp;amp;amp;gt; {
if (!req.headers.has('Content-Type')) {
req = req.clone({ headers: req.headers.set('Content-Type', 'application/json') });
}
req = req.clone({ headers: req.headers.set('Accept', 'application/json') });
return next.handle(req);
}
}
Interceptor is a mechanism, that automatically runs, when an event happens. Here, it will be executed whenever a POST request is being sent to our web service. The interceptor sets the Content Type as application/json in the header, so that we are free from setting the content type manually, before each request is being sent. It also sets the Accept flag as application/json in the header.
It’s to be added to app.module.ts file, if we want to run this interceptor.
app.module.ts
import { BrowserModule } from '@angular/platform-browser';
import { FormsModule, ReactiveFormsModule } from '@angular/forms';
import { NgModule } from '@angular/core';
import { AppComponent } from './app.component';
import { ConverterComponent } from './_components/converter/converter.component';
import { ConverterService } from './_services/index';
import { HttpClientModule } from '@angular/common/http';
import { RestConfiguration, RestInterceptor } from './_config/index';
import { HTTP_INTERCEPTORS } from '@angular/common/http';

@NgModule({
declarations: [
AppComponent,
ConverterComponent
],
imports: [
BrowserModule,
FormsModule,
ReactiveFormsModule,
HttpClientModule
],
providers: [{
provide: HTTP_INTERCEPTORS,
useClass: RestInterceptor,
multi: true
}, ConverterService, RestConfiguration],
bootstrap: [AppComponent]
})
export class AppModule { }
See both the Content Type and Accept flag is set by the interceptor while sending the request.
Step 18:
Crate another folder, namely _validators under TemperatureConverter > src > app and create a custom validator.
CustomValidator.ts
import { FormControl } from '@angular/forms';
export class CustomValidator {
static numberRequired(number): any {
if (number.pristine) {
return null;
}
let validNumber = /^[0-9]\d*(\.\d+)?$/;
if (validNumber.test(number.value)) {
return null;
}
number.markAsTouched();
return { invalidNumber: true };
}
}
This custom validator validates the input that is being typed in. If the input is not a number, it returns a JSON object, that tells an error has been occurred. Otherwise it returns null. If a JSON object is being returned, the convert button will be disabled and the error will be shown to the end user.


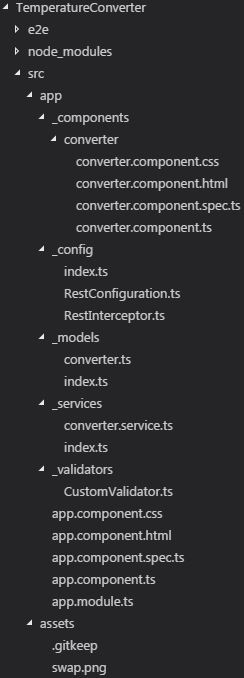
The project structure will look like this.
Step 19:
We’ve done. Run the web service first, then run the angular app. For that, type
ng serve -o in the terminal.
Step 20:
This is the last step ahead of our goal and is deployment. First and foremost, stop the web service as well as the Angular app. Then type ng build in the VS Code terminal to build the app. After having the build succeeded, a new folder, namely dist is created in the project folder.
If you want to build your application for production environment, type ng build –prod. It minimizes the file size by removing unwanted white spaces and uglifies it.
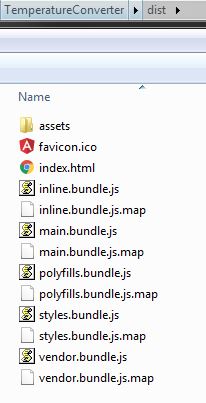
Copy the contents of dist and paste to the static folder of the web service. Once again start the web service and go to localhost:9900. Now you can see the project is running successfully.
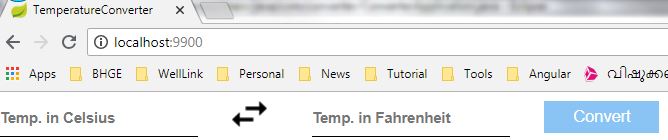
37 Celsius has been converted to 98.6 Fahrenheit.

Swaps between Celsius and Fahrenheit.

120 Fahrenheit has been converted to 48.88.

Thanks !