Karate Series | Session 7 | Karate Reports

What we explore in this series

Karate Basics
GET API
POST API
PUT API
DELETE API

Karate Config
Karate Reports

Karate has a built-in native HTML reporting feature, which should ideally serve all your needs. Still, you can enable cucumber reporting, which would also generate reports in the form of HTML.

If you wanted to enable the cucumber reporting feature, the following dependency to be added to the test scope. We had already discussed this in brief in the first session of this series.

<dependency>
    <groupId>net.masterthought</groupId>
    <artifactId>cucumber-reporting</artifactId>
    <version>5.3.0</version>
    <scope>test</scope>
</dependency>

We can easily integrate karate reporting with the CI tools as most of such tools would be able to process the output of the parallel runner and determine the status of the build as well as generate reports.

The native reporting feature does not only create an HTML file but also creates feature-wise output files in the form of XML and JSON. These output files will be consumed by third-party plugins like cucumber and generate catching HTML reports of their own.

There also exists another maven reporting plugin that is compatible with Karate JSON called Cluecumber.

Karate Reports

Once you run the TestRunner class (we’ve already gone through TestRunner in the first session of this series), all the feature files will get executed, and an HTML file called karate-summary.html will be generated in the following path.

<project-root-directory>/target/surefire-reports

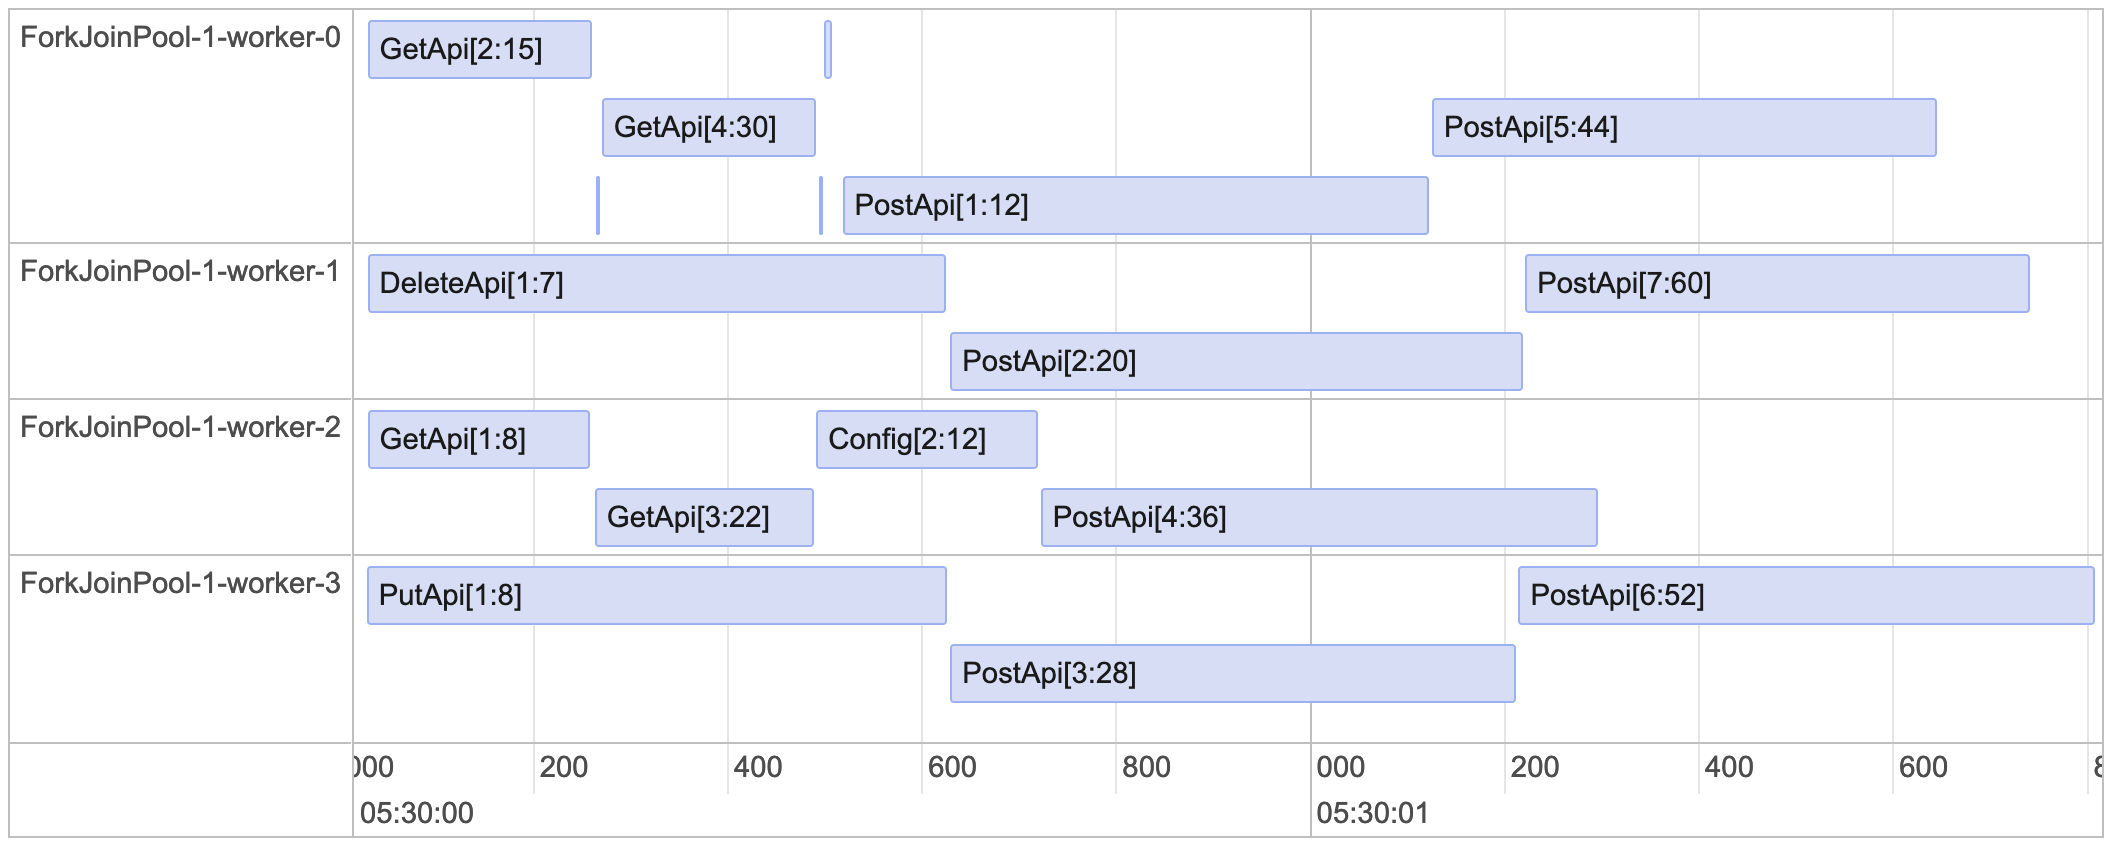
Apart from this summary file, feature-wise JSON and XML files will also be generated in the same directory. The directory will also contain another HTML file called timeline.html which shows an overall picture of the parallel tests done and says how much time was taken for each test.

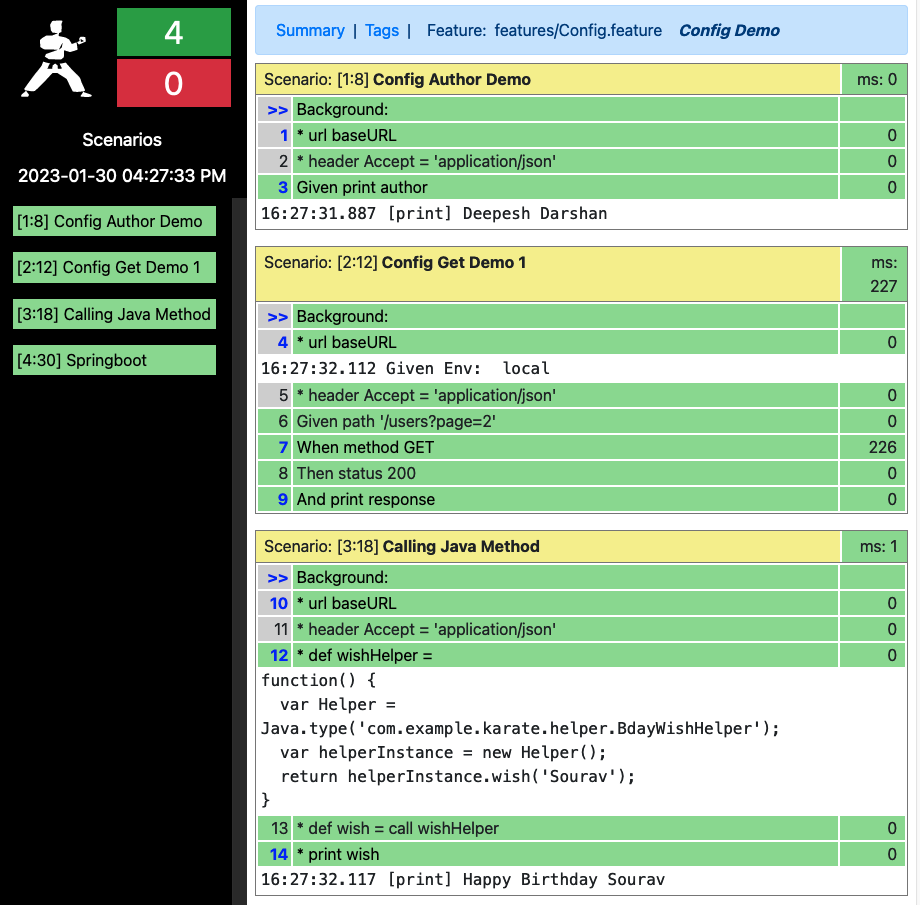
Here’s the karate-summary.html


This is what we get if we click on one of the features given in the above picture. All the steps for each scenario belonging to that feature will be listed and the time taken for each step will also be given.


Here’s the timeline.html

Cucumber Reports

If the cucumber reporting feature is enabled and the TestRunner gets run, it will create a file named overview-features.html in the following path. The path is customizable, and we can set this output directory location in the Configuration class of the Cucumber plugin.

<project-root-directory>/src/test/java/reports/cucumber-html-reports

Cucumber will read the JSON files generated by the Karate and generate a report of its own in this directory. So the code for generating cucumber reports has been written in the TestRunner class and the class would look like this.

import com.intuit.karate.KarateOptions;
import com.intuit.karate.Results;
import com.intuit.karate.Runner;
import com.intuit.karate.junit4.Karate;
import net.masterthought.cucumber.Configuration;
import net.masterthought.cucumber.ReportBuilder;
import org.apache.commons.io.FileUtils;
import org.junit.BeforeClass;
import org.junit.jupiter.api.Test;
import org.junit.runner.RunWith;

import java.io.File;
import java.util.ArrayList;
import java.util.Collection;
import java.util.List;


@RunWith(Karate.class)
@KarateOptions(features = "classpath:features", tags = "~@ignore")
public class TestRunner {

    @BeforeClass
    public static void init() {
        System.setProperty("karate.env", "local");
    }

    @Test
    public void testParallel() {
        Results results = Runner.path("classpath:features").tags("~@ignore").parallel(4);
        generateReport(results.getReportDir());
    }

    public static void generateReport(String outputPath) {
        Collection<File> jsonFiles = FileUtils.listFiles(new File(outputPath), new String[]{"json"}, true);
        List<String> jsonPaths = new ArrayList<>(jsonFiles.size());
        jsonFiles.forEach(file -> jsonPaths.add(file.getAbsolutePath()));
        Configuration config = new Configuration(new File("./src/test/java/reports"), "karate-api-automation");
        new ReportBuilder(jsonPaths, config).generateReports();
    }
}

This is how cucumber report looks like


If we click on one of the features, like Karate reports, each individual step can be seen.


If one of the tests gets failed, it will report like this

Finally, this is the project structure

So, here the Karate series has come to an end. We will catch up with another one soon.

Karate Series | Session 6 | Karate Config

What we explore in this series

Karate Basics
GET API
POST API
PUT API
DELETE API

Karate Config
Karate Reports

Karate config is nothing but a javascript function that returns a JSON object. The config file should be named karate-config.js and placed under classpath (src/test/java). At the time of startup, Karate will search for the config file in the classpath and read the configurations automatically.

The config file plays a crucial role in the application. It can be used to store global variables, set URLs, headers, authentication details, etc. It can also be used to define environments and the values of the variables can be dynamically changed based on the running environment.

The karate-config.js will be re-processed for every scenario. We can change this behavior by calling karate.callSingle() function.

A sample file is given below.

function fn() {
    var config = {
        author: 'Deepesh Darshan',
        baseURL: 'https://reqres.in/api'
    };

    var env = karate.env;
    karate.log('Given Env: ', env);
    if (env == 'dev') {
        config.baseURL = 'https://reqres.in/dev/api'
    } else if (env == 'prod') {
        config.baseURL = 'https://reqres.in/prod/api'
    } else if (env == 'local') {
        config.baseURL = 'https://reqres.in/api'
    }

    karate.configure('connectTimeout', 5000);
    karate.configure('readTimeout', 5000);
    return config;
}

Here, the baseURL is set as https://reqres.in/api. We can dynamically change the value of this variable based on the current running environment. We can set configuation settings like connectTimeout and readTimeout in the config file. We can also configure proxy settings, headers, cookies, etc in the config file.

The environment can be defined either in the TestRunner.java or by the maven command line, and it will be taken on runtime by the Karate.

// Java configuration
System.setProperty("karate.env", "local");

//mvn command line
mvn test -DargLine="-Dkarate.env=prod"

Now let’s go through different scenarios.

Scenario 1

Accessing config file value

  #Accessing config file value
  Scenario: Config Author Demo
    Given print author

We’ve already defined a global variable namely author and set its value ‘Deepesh Darshan‘ in karate-config.js. Karate will automatically read the config file and read the variable. So in the feature file, we can directly access the variable.

See the output of the above scenario:

17:16:43.553 [pool-1-thread-1] INFO com.intuit.karate - found scenario at line: 8 - ^Config Author Demo$
17:16:43.702 [ForkJoinPool-1-worker-1] INFO com.intuit.karate - Given Env:   
17:16:43.755 [ForkJoinPool-1-worker-1] DEBUG com.jayway.jsonpath.internal.path.CompiledPath - Evaluating path: $
17:16:43.775 [ForkJoinPool-1-worker-1] INFO com.intuit.karate - [print] Deepesh Darshan

Scenario 2

Accessing config file and calling GET API

Feature: Config Demo  

  Background:
    * url baseURL
    * header Accept = 'application/json'

  #Get request with config file value
  Scenario: Config Get Demo 1
    Given path '/users?page=2'
    When method GET
    Then status 200
    And print response

The baseURL, declared in the background, will get its value from the config file (it will take the default value, as the environment is not yet set), and using this we can run the scenario. Please note, in the given scenario, we never defined or declared any URLs, but still, it will call the GET API. The output of the scenario is given below:

17:20:57.082 [ForkJoinPool-1-worker-1] DEBUG com.jayway.jsonpath.internal.path.CompiledPath - Evaluating path: $
17:20:57.083 [ForkJoinPool-1-worker-1] INFO com.intuit.karate - [print] {
  "per_page": 6,
  "total": 12,
  "data": [
    {
      "color": "#98B2D1",
      "year": 2000,
      "name": "cerulean",
      "id": 1,
      "pantone_value": "15-4020"
    },
    {
      "color": "#C74375",
      "year": 2001,
      "name": "fuchsia rose",
      "id": 2,
      "pantone_value": "17-2031"
    },
    {
      "color": "#BF1932",
      "year": 2002,
      "name": "true red",
      "id": 3,
      "pantone_value": "19-1664"
    },
    {
      "color": "#7BC4C4",
      "year": 2003,
      "name": "aqua sky",
      "id": 4,
      "pantone_value": "14-4811"
    },
    {
      "color": "#E2583E",
      "year": 2004,
      "name": "tigerlily",
      "id": 5,
      "pantone_value": "17-1456"
    },
    {
      "color": "#53B0AE",
      "year": 2005,
      "name": "blue turquoise",
      "id": 6,
      "pantone_value": "15-5217"
    }
  ],
  "page": 1,
  "total_pages": 2,
  "support": {
    "text": "To keep ReqRes free, contributions towards server costs are appreciated!",
    "url": "https://reqres.in/#support-heading"
  }
}

Scenario 3

Calling a java method

In Karate, we can directly call java functions also. Here in this scenario, we have created a simple java class namely BdayWishHelper.java, and written a public method namely wish inside it. The method will accept a parameter of type string and return some string value.

package com.example.karate.helper;

public class BdayWishHelper {

    public String wish(final String name) {
        return "Happy Birthday " + name;
    }

}

We will call this method from the scenario and print the response.

  Scenario: Calling Java Method
    * def wishHelper =
    """
    function() {
      var Helper = Java.type('com.example.karate.helper.BdayWishHelper');
      var helperInstance = new Helper();
      return helperInstance.wish('Sourav');
    }
    """
    * def wish = call wishHelper
    * print wish

And, here’s the response:

18:05:38.136 [pool-1-thread-1] INFO com.intuit.karate - found scenario at line: 18 - ^Calling Java Method$
18:05:38.263 [ForkJoinPool-1-worker-1] INFO com.intuit.karate - Given Env:   
18:05:38.318 [ForkJoinPool-1-worker-1] DEBUG com.jayway.jsonpath.internal.path.CompiledPath - Evaluating path: $
18:05:38.356 [ForkJoinPool-1-worker-1] INFO com.intuit.karate - [print] Happy Birthday Sourav

Scenario 4

Calling a Springboot endpoint

There’s nothing special in it as calling a REST endpoint has already been covered in one of the previous posts. The only change here is, we’ve created our own endpoint using Springboot this time and called it from Karate. So let’s see the GET endpoint.

KarateController.java

package com.example.karate.controller;

import com.example.karate.service.KarateService;
import org.springframework.beans.factory.annotation.Autowired;
import org.springframework.web.bind.annotation.PathVariable;
import org.springframework.web.bind.annotation.RequestMapping;
import org.springframework.web.bind.annotation.RestController;

@RestController
@RequestMapping("/api")
public class KarateController {

    private KarateService service;

    @Autowired
    private KarateController(KarateService service) {
        this.service = service;
    }

    @RequestMapping("/hello/{name}")
    public String hello(@PathVariable String name) {
        return service.hello(name);
    }
}

KarateService.java

package com.example.karate.service;

public interface KarateService {
    public String hello(final String name);
}

KarateServiceImpl.java

package com.example.karate.service;

import org.springframework.stereotype.Service;

@Service("karateService")
public class KarateServiceImpl implements KarateService {

    @Override
    public String hello(final String name) {
        return "Hello "+name;
    }
}

So, this endpoint does nothing but accepts an input parameter of type string and returns some string value. This is how we call this endpoint from Karate.

    Scenario: Springboot
      Given url 'http://localhost:8050/api/hello/Sachin'
      When method GET
      Then status 200
      And print response

And, here’s the response:

18:20:44.569 [ForkJoinPool-1-worker-1] DEBUG org.apache.http.impl.conn.PoolingHttpClientConnectionManager - Connection released: [id: 0][route: {}->http://localhost:8050][total available: 1; route allocated: 1 of 5; total allocated: 1 of 10]
18:20:44.569 [ForkJoinPool-1-worker-1] DEBUG com.intuit.karate - response time in milliseconds: 118.72
1 < 200
1 < Connection: keep-alive
1 < Content-Length: 12
1 < Content-Type: application/json
1 < Date: Tue, 15 Nov 2022 12:50:44 GMT
1 < Keep-Alive: timeout=60
Hello Sachin

Here’s the full feature file.

Feature: Config Demo

  Background:
    * url baseURL
    * header Accept = 'application/json'

  #Accessing config file value
  Scenario: Config Author Demo
    Given print author

  #Get request with config file value
  Scenario: Config Get Demo 1
    Given path '/users?page=2'
    When method GET
    Then status 200
    And print response

  Scenario: Calling Java Method
    * def wishHelper =
    """
    function() {
      var Helper = Java.type('com.example.karate.helper.BdayWishHelper');
      var helperInstance = new Helper();
      return helperInstance.wish('Sourav');
    }
    """
    * def wish = call wishHelper
    * print wish

    Scenario: Springboot
      Given url 'http://localhost:8050/api/hello/Sachin'
      When method GET
      Then status 200
      And print response

In this session, we’ve seen how to write config and make use of it in Karate. That’s all for now. Thank you!

Karate Series | Session 5 | DELETE API

What we explore in this series

Karate Basics
GET API
POST API
PUT API
DELETE API
Karate Config
Karate Reports

As the name says, DELETE API is used to delete a resource on the server. Some conversations are roaming around like whether the DELETE request can be considered as idempotent. According to RFC-2616, since GET, HEAD, PUT and DELETE does not have any side effects, these can be considered as idempotent.

So, here we are going to see the scenario which sends requests to https://reqres.in/api/users API.

Given the feature file for DELETE API, which deletes a resource from the server and responds back with status code 204 if the operation is completed successfully.

Feature: Delete Api Demo

  Background:
    * url 'https://reqres.in/api'
    * header Accept = 'application/json'

    Scenario: First Delete Api demo
      Given path '/users/2'
      When method DELETE
      Then status 204

In this session, we’ve seen how to automate a DELETE request in Karate. That’s all for this session. Thank you!

Karate Series | Session 4 | PUT API

What we explore in this series

Karate Basics
GET API
POST API
PUT API
DELETE API
Karate Config
Karate Reports

Similar to POST, PUT requests are used to send data to the API to create or update a resource. The main difference between POST and PUT is that PUT requests are always idempotent. That is, calling the same PUT request multiple times will always produce the same result. if you PUT an object twice, it would have no additional effect. In contrast, if you are calling a POST request back to back will make side effects of creating the same resource multiple times on the server.

Generally, whenever a PUT request creates a resource on the server, it will respond with a response code 201, and if the request modifies an existing resource, the server will return 200.

So, here we are going to see different scenarios which send requests to https://reqres.in/api/users.

Scenario 1

A simple PUT request

  #First PUT
  Scenario: Put Api demo 1
    Given path 'https://reqres.in/api/users/2'
    And request {"name": "Stanley",  "job": "Doctor"}
    When method PUT
    Then status 200
    And print response

Here, we update an existing resource on the server. We replace the existing value of a user having id 2 with a new name and job. Since the resource already exists, we will receive a response code 200. And the response would be something like this.

{
  "name": "Stanley",
  "job": "Doctor",
  "updatedAt": "2022-10-27T07:11:44.273Z"
}

Scenario 2

PUT request with background

  Background:
    * url 'https://reqres.in/api'
    * header Accept = 'application/json'

  #PUT with background
  Scenario: Put Api demo 1
    Given path '/users/2'
    And request {"name": "Stanley",  "job": "Doctor"}
    When method PUT
    Then status 200
    And print response

As we have seen on the POST call, adding a background will not make any difference in the behavior of the request. It will work as before and send back a similar response.

So we’ve seen how to automate a PUT request with Karate with and without background. That’s all for this session. Here’s the full feature file for your reference.

Feature: Put Api Demo

  Background:
    * url 'https://reqres.in/api'
    * header Accept = 'application/json'

  #First PUT
  Scenario: Put Api demo 1
    Given path '/users/2'
    And request {"name": "Stanley",  "job": "Doctor"}
    When method PUT
    Then status 200
    And print response

In this session, we’ve seen how to automate a PUT request in Karate. That’s all for this session. Thank you!

Karate Series | Session 2 | GET API

What we explore in this series

Karate Basics
GET API
POST API
PUT API
DELETE API
Karate Config
Karate Reports

We all know, GET is an HTTP method used to retrieve information from a source. In this session, we are going to see how a GET request can be automated using Karate.

First, we are going to write a new feature, namely, Get Api feature. Inside the feature, we will write a scenario. And inside that scenario, we will write all the steps that are to be executed when the scenario gets run. Either we can run the entire feature file as a whole or execute each scenario. All the modern IDEs support running each scenario separately.

We are going to save our feature file in /src/test/java/features directory as GetApi.feature. It’s important that all the feature files should have a valid file name with the extension .feature.

Since we are not creating any REST endpoint for this session, we are making use of https://reqres.in/api in this series, and as you can see this API supports almost all HTTP methods.

So let’s start off.

Scenario 1

A simple GET call.

Feature: Get Api feature

  Scenario: Get API demo 1
    Given url 'https://reqres.in/api/users?page=2'
    When method GET
    Then status 200 (OK)
    And print response

Let’s go through the steps of what we are going to achieve here.

  1. Sends a request to https://reqres.in/api users?page=2
  2. Defines the request type (GET in this case)
  3. Asserts the response status as 200
  4. Finally, prints the response

Here’s the response we received.

{
  "per_page": 6,
  "total": 12,
  "data": [
    {
      "last_name": "Lawson",
      "id": 7,
      "avatar": "https://reqres.in/img/faces/7-image.jpg",
      "first_name": "Michael",
      "email": "michael.lawson@reqres.in"
    },
    {
      "last_name": "Ferguson",
      "id": 8,
      "avatar": "https://reqres.in/img/faces/8-image.jpg",
      "first_name": "Lindsay",
      "email": "lindsay.ferguson@reqres.in"
    },
    {
      "last_name": "Funke",
      "id": 9,
      "avatar": "https://reqres.in/img/faces/9-image.jpg",
      "first_name": "Tobias",
      "email": "tobias.funke@reqres.in"
    },
    {
      "last_name": "Fields",
      "id": 10,
      "avatar": "https://reqres.in/img/faces/10-image.jpg",
      "first_name": "Byron",
      "email": "byron.fields@reqres.in"
    },
    {
      "last_name": "Edwards",
      "id": 11,
      "avatar": "https://reqres.in/img/faces/11-image.jpg",
      "first_name": "George",
      "email": "george.edwards@reqres.in"
    },
    {
      "last_name": "Howell",
      "id": 12,
      "avatar": "https://reqres.in/img/faces/12-image.jpg",
      "first_name": "Rachel",
      "email": "rachel.howell@reqres.in"
    }
  ],
  "page": 2,
  "total_pages": 2,
  "support": {
    "text": "To keep ReqRes free, contributions towards server costs are appreciated!",
    "url": "https://reqres.in/#support-heading"
  }
}

So, our first scenario got passed and we got the response as well. If we change the assertion, for example, the status to 201, our scenario will obviously fail, and the output would be something like this.

GetApi.feature:11 - status code was: 200, expected: 201, response time: 1786, url: https://reqres.in/api/users?page=2

From the above text, it’s clearly understood that our scenario has been failed due to an incorrect response status code. What we expected was 201, but received 200.

Scenario 2

GET call with Background

Feature: Get Api feature

  Background:
    * url 'https://reqres.in/api'
    * header Accept = 'application/json'

  Scenario: Get API demo 2
    Given path '/users?page=2'
    When method GET
    Then status 200
    And print responseStatus

The Background is a block where we can put common things. The Background block will be executed during each scenario, so that we can declare global variables, set URLs, and even headers. In our example, we set the URL and header in the background, and the path is set in the scenario. So the actual request URL would be background URL + path.

We will get the same response as before when we run this scenario.

Scenario 3

GET call with query param

Feature: Get Api feature

  Background:
    * url 'https://reqres.in/api'
    * header Accept = 'application/json'

  #With param
  Scenario: Get API demo 3
    Given path '/users'
    And param page = 2
    When method GET
    Then status 200
    And print "response time: " + responseTime

Here, we are executing the same query as before. The only difference here is, the param has been declared in an additional step. After all, Scenarios 2 & 3 are the same.

Here we have also printed response time as well. The output for the same is given below.

06:50:48.952 [ForkJoinPool-1-worker-1] INFO com.intuit.karate - [print] response time:1319

Scenario 4

Verify the response with assertions

Feature: Get Api feature

  Background:
    * url 'https://reqres.in/api'
    * header Accept = 'application/json'

  #With Assertions
  Scenario: Get API demo 4
    Given path '/users'
    And param page = 2
    When method GET
    Then status 200
    And match response.data[0].first_name != null
    And assert response.data.length == 6
    And match $.data[3].id == 10

Like we usually do in Junit, we can assert and match things here also. The assert keyword can be used to assert an expression that returns a boolean value. Everything to the right of the assert keyword will be evaluated as a single expression.

The match operation is more elegant because the white-space does not matter here, and the order of keys (or data elements) does not matter. The match syntax involves a double-equals sign ‘==’ to represent a comparison. The dollar symbol ($) given in this example represents the response object.

The entire GetApi.feature file is given below.

Feature: Get Api feature

  Background:
    * url 'https://reqres.in/api'
    * header Accept = 'application/json'

  #Without background
  Scenario: Get API demo 1
    Given url 'https://reqres.in/api/users?page=2'
    When method GET
    Then status 201
    And print response

  #With background
  Scenario: Get API demo 2
    Given path '/users?page=2'
    When method GET
    Then status 200
    And print responseStatus

  #With param
  Scenario: Get API demo 3
    Given path '/users'
    And param page = 2
    When method GET
    Then status 200
    And print "response time: " + responseTime

  #With Assertions
  Scenario: Get API demo 4
    Given path '/users'
    And param page = 2
    When method GET
    Then status 200
    And match response.data[0].first_name != null
    And assert response.data.length == 6
    And match $.data[3].id == 10

In this session, we’ve seen how to automate a GET request in Karate. That’s all for this session. Thank you!